
 Looking for accurate information about the EPA RRP rule?
 Using LeadCheck To Test Paint On Drywall (Gypsum) And Plaster Surfaces Is Easy!
 EPA has recently updated recognition of the 3M™ LeadCheck™ for use on drywall and plaster. Below are the specific instructions from the manufacturer, 3M, for conducting testing of drywall and plaster for lead. These instructions must be followed by the certified renovator for the test results to be recognized under the RRP rule by EPA. I think the key point to remember when doing such testing is that you are testing the paint, not the drywall:
Instructions for using LeadCheck to test drywall and plaster:
Sulfates present in drywall (gypsum) and plaster dust can interfere with 3M™ LeadCheck™ Swabs color development. It is possible with a minimum amount of care to accurately test for lead paint on plaster surfaces with 3M™ LeadCheck™ Swabs.
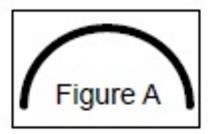 a) With a clean utility knife, make a nickel sized half circle cut at a low angle (about 5 degrees) cutting down to the bare drywall (gypsum) and plaster core to expose all layers of paint. Make the cut as seen in figure A.
b) Fold down the semicircular flap with the knife blade so that it forms a pocket.
c) Using an activated 3M™ LeadCheck™ Swab, hold the swab above the cut allowing the 3M™ LeadCheck™ reagent to flow into the pocket making sure that the liquid contacts all layers of paint both in the cut itself and the peeled back flap. Carefully rub the swab around the periphery of the peeled back flap, taking care not to contact the drywall (gypsum) or plaster. Only rub the swab on all layers of paint found on the flap. Do not rub the swab in the pocket.
d) If lead is present, a pink or red color will develop along the edges of the cut, flap, or swab tip usually within 30 seconds.
e) If no pink or red color develops, immediately confirm the negative result by squeezing a drop of the 3M™ LeadCheck™ reagent onto one of the confirmation card dots. It should turn red immediately.


