
I first learned about using copper wire frets from a video I found by Shane Speal. Shane used them on a diddley bow. In the video he pointed that because it was only one string the accuracy o f installation of the frets wasn’t all that critical. My plan was to use the copper wire frets for both 3 and 4 string cigar box guitars. I had to come up with a method to install them in an accurate enough way so the instruments would be playable. I had fun figuring it out and I certainly learned many lessons. In the video below I share many of the lessons learned as a way to help you avoid potential mistakes and possible frustration if you plan to attempt using in one of your CBG builds.
Measure twice, cut once
Before you watch the video I will explain how I prepared the fretboard in advance of installation. I also assembled the bulleted list below of engineering considerations to ponder and solve before you begin your build. I think you will find my list very helpful to already have in your head before you watch the video. That way the video will not only offer you some advice from my lessons learned before you begin, but you can also go back over the video and pause it where needed to observe details to help you address all of the points in my bulleted list. Maybe think of it as your engineering research.
How I prepared the fretboard for copper wire frets
 Once I figured out how many frets I could install I marked the precise fret positions on the fretboard based on the scale length. I used my C.B. Gitty Cigar Box Guitar Fretting Miter Box and a fretting saw to cut the frets, just as if I were using real frets. Then I used a smaller triangular file to create a “trough” within the saw kerfs for the wire frets to sit in when I installed them. This step is critical because, unlike Shane’s diddley bow, I had to make the sure the copper wire frets stayed in place and maintained a consistent height down the fretboard, so the guitar would be playable with no buzzing. You don’t need too much of a trough because the round wire will stay in place when you tighten it up. So be careful not to file too much, and keep the trough shape and depth across the neck consistent. This is required so the wire’s height will maintain the same elevation across the fretboard width, and the height of each fret will be the same going down the neck. Do this for all your fret slots and you will be ready to install the copper wire frets.
Tip: Don’t use a tapered triangular file as you will risk creating an uneven trough as you file back and forth and because it will “roll”. Use a straight file if you have one, or some tapered files are only tapered near the nose, so only use the part of the file closest to the handle.
Installing the copper wire frets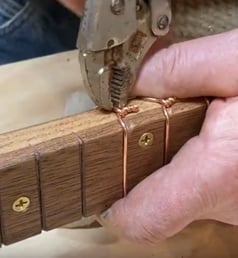
One of my next blogs will include some pointers as well as an instructional video on how to make and install the copper wire frets on your cigar box guitar. I’ll also include a list of the tools you will need to install them. Be sure to subscribe to my blog at the bottom of this page so you will be notified when that blog is posted.
List of important points to take from the video below
- All of these points should be considered before you start assembling your plan, as they are interdependent in many ways
- Plan things out and do your “engineering” before you start your build
- Decide how you will set the action above the first fret at the nut
- Decide how you will keep the strings from sliding around at the nut area as you play
- Assess how many frets you will actually be able to install before you cut the fret slots in the fret board
- Accuracy of fret installation and maintaining a consistent fret height above the fretboard will be important
- Action at the 12th fret will be set by the height of your bridge/saddle and needs to be adequate to prevent buzzing.
- Plan for proper break angle from the saddle back to the tail so you can get proper intonation when tuning up your new CBG
I hope you found that helpful
Let me know what you think. Be sure to leave a comment below!